
What Will This Article Do for Me?
This article provides guidance on validating that the eCQM measure data intended for transmission from your EHR to Patient360 (P360) was fully ingested and that the resulting measure calculations are accurate.
Why is Validation Important?
While ensuring data accuracy is naturally top-of-mind for any organization, it is also a strict regulatory requirement.
Federal regulations for the Medicare Shared Savings Program (MSSP) require certification - at the time of data submission - that all submitted information is true, accurate, and complete to the best of our knowledge. Furthermore, we must certify that if we become aware that any submitted information is not true, accurate, and complete, we will promptly correct such information or refrain from submitting it. Failing to do so risks serious federal penalties.
How Often Should Validation Be Done?
Validation should occur with every data upload.
Best Practice: Extract and validate your first round of data early in the reporting year (ideally by April or May).
If discrepancies occur: Begin troubleshooting immediately to identify and resolve issues, then send and validate a new round of data by the following month.
If data validates cleanly: Plan to send and validate the next round of data after the close of Quarter 2.
Steps to Validate eCQM QRDAI Data
Ensure Successful File Imports
Obtain EHR Validation Numbers and Enter Them into the P360 Validation Tab
Assess Validation Status
Troubleshoot and Resolve All Validation Discrepancies
Logic Check Performance Results
Detailed Steps to Validate eCQM QRDAI Data
STEP 1: Ensure Successful File Imports
Monitor file processing, troubleshoot and resolve any import failures.
Once files have been imported to P360, it’s important to monitor to make sure all files are processed.
Log in to P360 and navigate to the relevant member TIN.
Go to Imports > QRDA-I > History (ZIP Files tab)
Review the Pending and Failed columns.
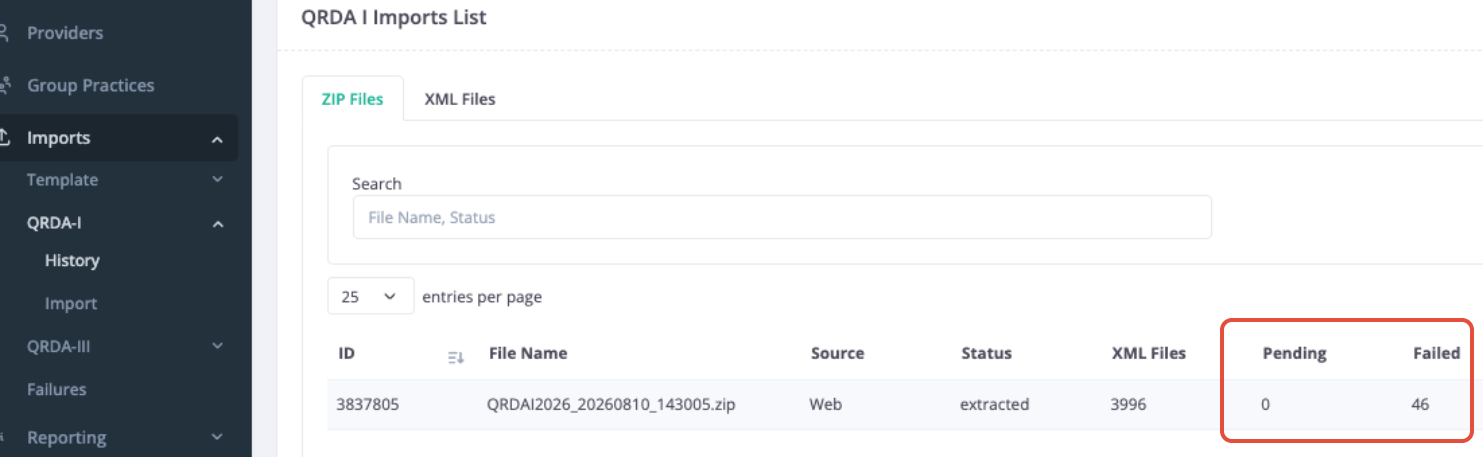
If you see any rows where Pending is not zero then that means the data isn’t finished processing. Repeat Step 1 until Pending is zero for all rows.
Next, if you see that all rows have zero Failed then continue to Step 2 below. Otherwise, navigate to Imports > Failures. If a large number of failures are listed, consider export and filter to help you examine the issues.

Refer to Import Failures Guide to understand the best course of action for each type of failure.
For any rows showing failures, select the ellipsis (three vertical dots) to the right to view additional details on an XML file-by-file basis.
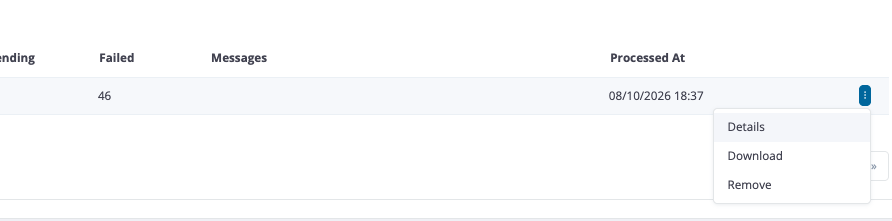
Repeat Step 1 until all failures are remediated.
STEP 2: Obtain EHR Validation Numbers and Enter Them into the P360 Validation Tab
Obtaining EHR Validation Numbers from the EHR.
Work with your member TINs to contact or open a support ticket with their EHR vendor for instructions on obtaining the best resource for APP+ eCQM quality measure validation.
This varies by vendor and typically involves taking a screenshot of a MIPS Dashboard or generating an EHR report showing the Denominator, Numerator, Exclusions/Exceptions, and Performance Rate for each APP+ eCQM measure.
Tip: Consult the P360 resources under Learning Center > Knowledge Base to check if updated validation instructions for your specific EHR vendor are available.
Entering EHR Validation Numbers into the P360 Validation Tab
Enter EHR validation numbers into the Validation tab as soon as you receive them. There is no need to wait for QRDA-I files to finish processing.
Input EHR validation numbers only into the gold-shaded columns.
Do not type in any blue-shaded cells; these populate automatically with P360 numbers and contain underlying formulas that drive tab functionality.
In the Notes column (the last column) of the Validation tab, document the date updated EHR numbers were entered along with your initials. (Optional step depending on team workflow.) This allows viewers to determine whether visible discrepancies are simply due to pending EHR updates.
Important: EHR validation numbers should be obtained at or near the same time as QRDA-I files are created. Aligning creation times ensures the Dates of Service (DOS) in the QRDA-I correspond to the DOS in the validation numbers, preventing "apples-to-oranges" comparison issues.
Success Tip: Ensure you have access to - or can readily obtain - patient level details in the EHR for each of the measures. Troubleshooting (detailed below) often requires comparisons of patient-level data between P360 and the EHR to help identify root cause and resolution of certain discrepancies.
Alternative Method: Using QRDA-III Files
Instead of pulling numbers from an EHR dashboard manually, you may obtain QRDA-III files at the same time as your QRDA-I files.
The QRDA-III file should be at the TIN level and contain a summary of all 5 measures.
Notify P360 that you intend to delivery QRDAIII files so that this feature may be set up for you.
Once set up in P360, you will deliver the QRDA-III file to P360 using the drag-and-drop feature under Imports > QRDAIII > Import.
Once you deliver a QRDAIII to a TIN in P360 for first time, be sure to let your P360 project lead know so the Implementation Sheet formulas can be configured correctly to automatically pull the validation counts.
STEP 3: Assess Validation Status
First, verify that P360 numbers populate in the Validation tab across the 8 blue-shaded columns (Eligible Population, Denominator, Met, etc.).
Once QRDA-I files are successfully ingested, allow time for measure calculations and background processes to run. This usually occurs within a few hours, though it may take 2–3 days during high-volume periods late in the reporting year.
P360 numbers in the Validation tab are fully updated when they match the figures on the TIN’s Group Practice Dashboard in P360.
Next, examine the validation results in the EHR Denominator Difference (Denom Diff) and EHR Performance Difference columns.
Discrepancies ≤ 5%: Generally considered acceptable (shaded green).
Discrepancies > 5%: Require investigation (shaded yellow or red).
Discrepancies above 5% require troubleshooting to identify root causes and implement fixes.
STEP 4: Troubleshoot* and Resolve All Validation Discrepancies
SCENARIO A: P360 Denominator is LOWER than EHR Denominator
Were the validation scores obtained well after the QRDA-I files were generated? Denominators in validation scores obtained days or weeks after the QRDA-I files were generated will not be reflected in the QRDA-I files or P360.
Did the EHR count include Exclusions? P360 Denominator counts exclude Exclusions, whereas some EHRs combine Exclusions into the Denominator. Subtract the EHR Exclusions count from the EHR Denominator; if the resulting number matches the P360 denominator, this supports that the EHR is just including Exclusions in their Denominator counts.
Did the EHR count patients multiple times across providers? Consult the TIN/EHR vendor to determine if patients with multiple provider visits were counted multiple times in the QRDA-I. P360 requires TIN-based validation scores.
Were there Import Failures? Re-check Imports History to confirm no files failed during or after your initial validation steps.
Are there "Not Applicable" patient encounters in P360?
A Not Applicable status means that the patient in a QRDA-I is not part of the Initial Population of the measure (i.e., not “denominator eligible”)
To look for this, log in to the relevant TIN in P360 > Group Practice > [name of the TIN]. This will show the Measure Overview.
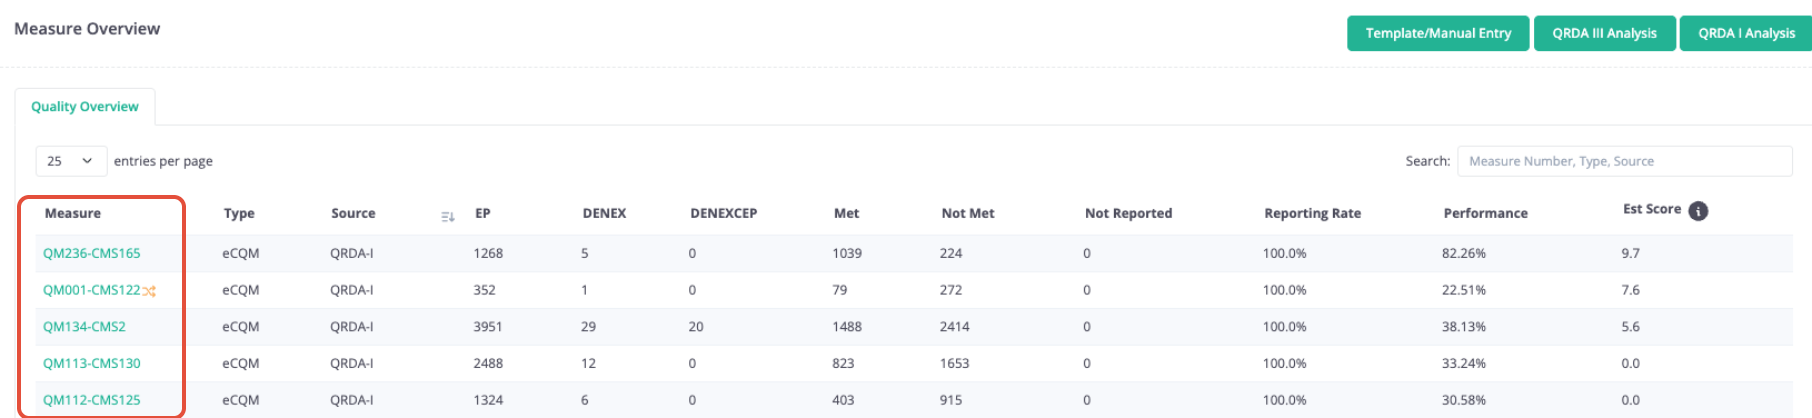
Next click on the relevant measure in this view. This will take you to the patient-level measure details in P360.
Here you can filter by Not Applicable and/or Export to filter for closer examination.
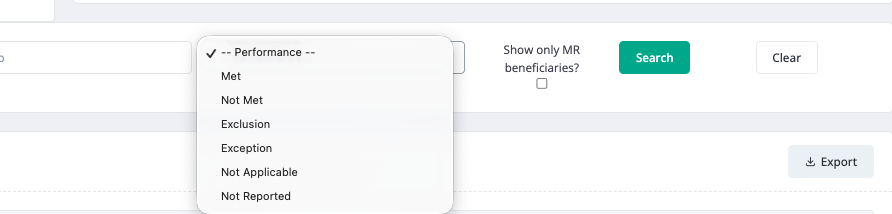
If an unexpected number of patients show as "Not Applicable," compare patient-level data between P360 and the EHR and identify 2–3 affected patients.
Common causes of Not Applicables include:
the EHR is creating a single QRDA-I for a patient with multiple quality measures, some of which aren’t applicable to the patient - these can be ignored;
the EHR is miscalculating the measure - share examples of P360/EHR patients that don’t match with P360 and/or your EHR.
Are the QRDA-I files TIN-based instead of NPI-based? P360 expects NPI-based QRDA-I files (one QRDA-I per provider per patient). Confirm data structure with the TIN/EHR vendor.
Are EHR patient encounters missing from P360?
Compare patient-level lists between systems.
Identify 2–3 patients present in the EHR but missing in P360, and share their details via a P360 support ticket. (Note: Patient360's ticketing system is PHI/HIPAA-compliant.)
SCENARIO B: P360 Denominator is HIGHER than EHR Denominator
Were extraction times aligned? Verify if EHR validation numbers were pulled at or near the same time as the QRDA-I export. Validation numbers from prior runs should be deleted.
Did P360 receive out-of-scope data? Check if the QRDA-I included non-member TIN providers while auto-provisioning was enabled in P360. Verify provider NPIs across both systems.
Is the EHR Dashboard not including all patients represented in the QRDAI files? Verify instructions for generating NPI-based QRDA-Is and viewing TIN-based measure scores with your EHR.
Is the EHR Dashboard and/or P360 miscalculating measure results? Given the complexity of eCQM specifications, differences in interpretation or software programming can sometimes cause performance rate mismatches between your EHR and P360. Find patient examples of these differences and share with P360 in a support ticket.
Are duplicate patient instances present? If multiple QRDA-I files exist for a single patient under different Patient IDs, the denominator will be inflated. Open a support ticket with the EHR vendor to resolve Patient ID discrepancies. (Note: Duplicate patients will still de-duplicate at the ACO level.)
SCENARIO C: Performance Discrepancies
Check Denominators First. If denominator discrepancies exist, resolve those prior to investigating performance differences.
Compare Categorical Differences. Examine differences in counts for Met, Not Met, and Exceptions between the P360 (blue) columns and the EHR (gold) columns. This can provide clues to what’s going on and where you need to look next.
Submit Examples. If you need help, be sure to include 2–3 patient examples that were evaluated differently in P360 compared with the EHR in your P360 support ticket.
*Need help troubleshooting? Submit a P360 support ticket with 2–3 patient examples where calculations differ between P360 and your EHR.
Remediation
Once discrepancy causes are identified, perform necessary remediation steps (e.g., re-extracting and importing updated QRDA-I files).
Repeat the validation cycle until all discrepancies drop to 5% or below (Green).
STEP 5: Logic Check Performance Results
Once EHR and P360 numbers are aligned, evaluate the scored measure results:
Review the Group Practice Dashboard (Measure Overview) for each TIN and the ACO-Level Dashboard.
Visually inspect each measure's performance rate to ensure the results make sense and align with expectations.
Relevant actions might include, for example, following up directly with clinical staff in the TIN to ensure proper documentation according to the measure specifications or EHR requirements.